python Amazon Rekognition detect_facesその2
はじめに
detect_facesの結果を分析してBoundingBoxと顔のパーツの位置を埋め込む処理を実装した。
流石にカート・コバーンの画像を使うのは気が引けるので画像なしで。
準備
下記のプログラムを用意する。
- detect_faces.py
import boto3, sys, json, cv2, math, os, traceback

#detect_facesで顔の分析結果を返す
def detect_faces(in_image_file):
    client=boto3.client('rekognition')
    #写真を読み出して、Byte変換してdetect_faces送信
    file = open(in_image_file,'rb')
    response = client.detect_faces(Image={'Bytes':file.read()},Attributes=['ALL'])

    return response

#BoundingBoxを設定して返す
def set_bounding_box(image_file, bounding_box_data):
    #画像の高さと幅を取得
    imgHeight, imgWidth = image_file.shape[:2]

    #位置を算出
    left = math.ceil(bounding_box_data['Left'] * imgWidth)
    top = math.ceil(bounding_box_data['Top'] * imgHeight)
    width = math.ceil(bounding_box_data['Width'] * imgWidth)
    height = math.ceil(bounding_box_data['Height'] * imgHeight)

    image_file = cv2.rectangle(image_file
                            , (left, top)
                            , (width+left, height+top)
                            , (0,255,0)
                            , 2)

    return image_file

#Landmarksを設定して返す
def set_landmarks(image_file, landmarks):
    #画像の高さと幅を取得
    imgHeight, imgWidth = image_file.shape[:2]

    eyeLeft = get_lndmark('eyeLeft', landmarks)
    eyeRight = get_lndmark('eyeRight', landmarks)
    mouthLeft = get_lndmark('mouthLeft', landmarks)
    mouthRight = get_lndmark('mouthRight', landmarks)
    nose = get_lndmark('nose', landmarks)

    landmark_taple_list = [eyeLeft, eyeRight, mouthLeft, mouthRight, nose]

    #位置を算出
    for landmark_taple in landmark_taple_list:
        X = math.ceil(landmark_taple[0] * imgWidth)
        Y = math.ceil(landmark_taple[1] * imgHeight)

        image_file = cv2.rectangle(image_file
                                , (X, Y)
                                , (X, Y)
                                , (0,255,0)
                                , 10)

    return image_file

#landmarkを指定してX,Y取得
def get_lndmark(landmark_type, landmarks):
    for landmark in landmarks:
        if(landmark['Type'] == landmark_type):
            return (landmark['X'], landmark['Y'])

if __name__ == '__main__':
    if len(sys.argv) != 3:
        exit()

    in_file_name = sys.argv[1]
    out_file_name = sys.argv[2]

    try:
        #顔分析
        #jsonが無ければ分析あれば使う
        json_file_name = in_file_name + '.json'
        if (os.path.exists(json_file_name) == True):
            file = open(json_file_name, 'r')
            response = file.read()
            response = json.loads(response)
        else:
            response = detect_faces(in_file_name)
            file = open(json_file_name, 'w')
            file.write(json.dumps(response))

        #分析元の画像を読み込み
        origin_image = cv2.imread(in_file_name)
        after_image = origin_image.copy()

        #画像に分析結果の設定
        for faceDetail in response['FaceDetails']:
            #boundingboxを設定
            print('対象の年齢は'+ str(faceDetail['AgeRange']['Low']) + 'から' + str(faceDetail['AgeRange']['High']))
            after_image = set_bounding_box(after_image, faceDetail['BoundingBox'])
            after_image = set_landmarks(after_image, faceDetail['Landmarks'])


        #結果の出力
        if after_image is not None:
            cv2.imwrite(out_file_name, after_image)


    except Exception as e:
        print(e)
        print(traceback.format_exc())
実行方法
python detect_faces.py 分析したいファイル.jpg 出力したいファイル名.jpg
今回のは関数分けをして見通しを良くしたのと何度も分析しないようにレスポンスを外に吐き出すようにした。
例外も盛り込んでNG処理をスッキリさせることもできた。
landmarkはX,Yの2値なのでタプルを作って、タプルの配列に設定してforで回してみた。
まとめ
大体やってみたいことは実装できた。
タプルの取得と配列設定はもう少しスッキリかっこよく書く方法はないものかな?
python Amazon Rekognition detect_facesその1
はじめに
Amazon Rekognitionでdetect_facesを使用してみる。
今回は書くことがないので短め
準備
下記の画像をdetect_facesで分析させる。

下記のプログラムを用意する。
- detect_faces.py
import boto3, sys, json

if len(sys.argv) != 2:
    exit()

client=boto3.client('rekognition')
#写真を読み出して、Byte変換してdetect_faces送信
file = open(sys.argv[1],'rb')
response = client.detect_faces(Image={'Bytes':file.read()},Attributes=['ALL'])

print('Detected faces for ' + sys.argv[1])
print()
for faceDetail in response['FaceDetails']:
    print(json.dumps(faceDetail, indent=4, sort_keys=True))
実行方法
python detect_faces.py 画像ファイル.jpg
実行結果
Detected faces for kurt-cobain-20191028-001.jpg

{
    "AgeRange": {
        "High": 34,
        "Low": 22
    },
    "Beard": {
        "Confidence": 77.95692443847656,
        "Value": true
    },
    "BoundingBox": {
        "Height": 0.23728753626346588,
        "Left": 0.36626124382019043,
        "Top": 0.07902675867080688,
        "Width": 0.10884405672550201
    },
    "Confidence": 99.9982681274414,
    "Emotions": [
        {
            "Confidence": 66.24143981933594,
            "Type": "CALM"
        },
        {
            "Confidence": 19.93850326538086,
            "Type": "CONFUSED"
        },
        {
            "Confidence": 4.765133380889893,
            "Type": "SAD"
        },
        {
            "Confidence": 3.4628701210021973,
            "Type": "SURPRISED"
        },
        {
            "Confidence": 3.388702869415283,
            "Type": "ANGRY"
        },
        {
            "Confidence": 0.9147283434867859,
            "Type": "FEAR"
        },
        {
            "Confidence": 0.8962799906730652,
            "Type": "DISGUSTED"
        },
        {
            "Confidence": 0.3923453986644745,
            "Type": "HAPPY"
        }
    ],
    "Eyeglasses": {
        "Confidence": 99.44938659667969,
        "Value": false
    },
    "EyesOpen": {
        "Confidence": 97.86561584472656,
        "Value": true
    },
    "Gender": {
        "Confidence": 99.65865325927734,
        "Value": "Male"
    },
    "Landmarks": [
        {
            "Type": "eyeLeft",
            "X": 0.39052438735961914,
            "Y": 0.16976229846477509
        },
********中略********
    ],
    "MouthOpen": {
        "Confidence": 69.85497283935547,
        "Value": false
    },
    "Mustache": {
        "Confidence": 91.35269165039062,
        "Value": false
    },
    "Pose": {
        "Pitch": 19.76197624206543,
        "Roll": 0.11792755126953125,
        "Yaw": -20.5476016998291
    },
    "Quality": {
        "Brightness": 93.4253921508789,
        "Sharpness": 86.86019134521484
    },
    "Smile": {
        "Confidence": 99.43907165527344,
        "Value": false
    },
    "Sunglasses": {
        "Confidence": 99.6850814819336,
        "Value": false
    }
}
まとめ
細かな解説は後日に。
これもBoundingBoxを付与したりしてみたい。
python Amazon Rekognition detect_labelsその2
※若干プログラムを修正しました。
はじめに
Amazon Rekognitionで分析した画像にBoundingBoxとラベルを表示させてみる。
準備
事前に下記の画像をAmazon Rekognitionで分析させてJsonファイルを取得しておく。

下記のプログラムを用意する。
- detect_labels.py
import boto3, sys, json, cv2, math, os, traceback

#detect_labelsで画像の分析結果を返す
def detect_labels(in_image_file):
    client=boto3.client('rekognition')
    #写真を読み出して、Byte変換して送信
    file = open(in_image_file,'rb')
    response = client.detect_labels(Image={'Bytes':file.read()}, MaxLabels=30)

    return response

#BoundingBoxを設定して返す
def set_bounding_box(image_file, label_name, instances):
    #画像の高さと幅を取得
    imgHeight, imgWidth = image_file.shape[:2]

    for instance in instances:
        left = math.ceil(instance['BoundingBox']['Left'] * imgWidth)
        top = math.ceil(instance['BoundingBox']['Top'] * imgHeight)
        width = math.ceil(instance['BoundingBox']['Width'] * imgWidth)
        height = math.ceil(instance['BoundingBox']['Height'] * imgHeight)

        image_file = cv2.putText(image_file
                                , label_name
                                , (left, height+top)
                                , cv2.FONT_HERSHEY_PLAIN
                                , 2
                                , (255, 255, 255)
                                , 2
                                , cv2.LINE_AA)
        image_file = cv2.rectangle(image_file
                                , (left, top)
                                , (width+left, height+top)
                                , (0,255,0)
                                , 2)
    return image_file

if __name__ == '__main__':
    if len(sys.argv) != 3:
        exit()

    in_file_name = sys.argv[1]
    out_file_name = sys.argv[2]

    try:
        #jsonが無ければ分析あれば使う
        json_file_name = in_file_name + '.json'
        if (os.path.exists(json_file_name) == True):
            file = open(json_file_name, 'r')
            response = file.read()
            response = json.loads(response)
        else:
            response = detect_labels(in_file_name)
            file = open(json_file_name, 'w')
            file.write(json.dumps(response))

        #分析元の画像を読み込み
        origin_image = cv2.imread(in_file_name)
        after_image = origin_image.copy()

        #画像にBounding Boxの設定
        for label in response['Labels']:
            #信頼が90未満の場合設定しない
            if label['Confidence'] < 90:
                continue
            #Instancesが無い場合は設定しない
            if not label['Instances']:
                continue

            after_image = set_bounding_box(after_image, label['Name'], label['Instances'])

        #結果の出力
        if after_image is not None:
            cv2.imwrite(out_file_name, after_image)
    except Exception as e:
        print(e)
        print(traceback.format_exc())
実行方法
python boundingBox.py bef.jpg aft.jpg
実行結果
Bounding Boxを付与したイメージが以下となる。
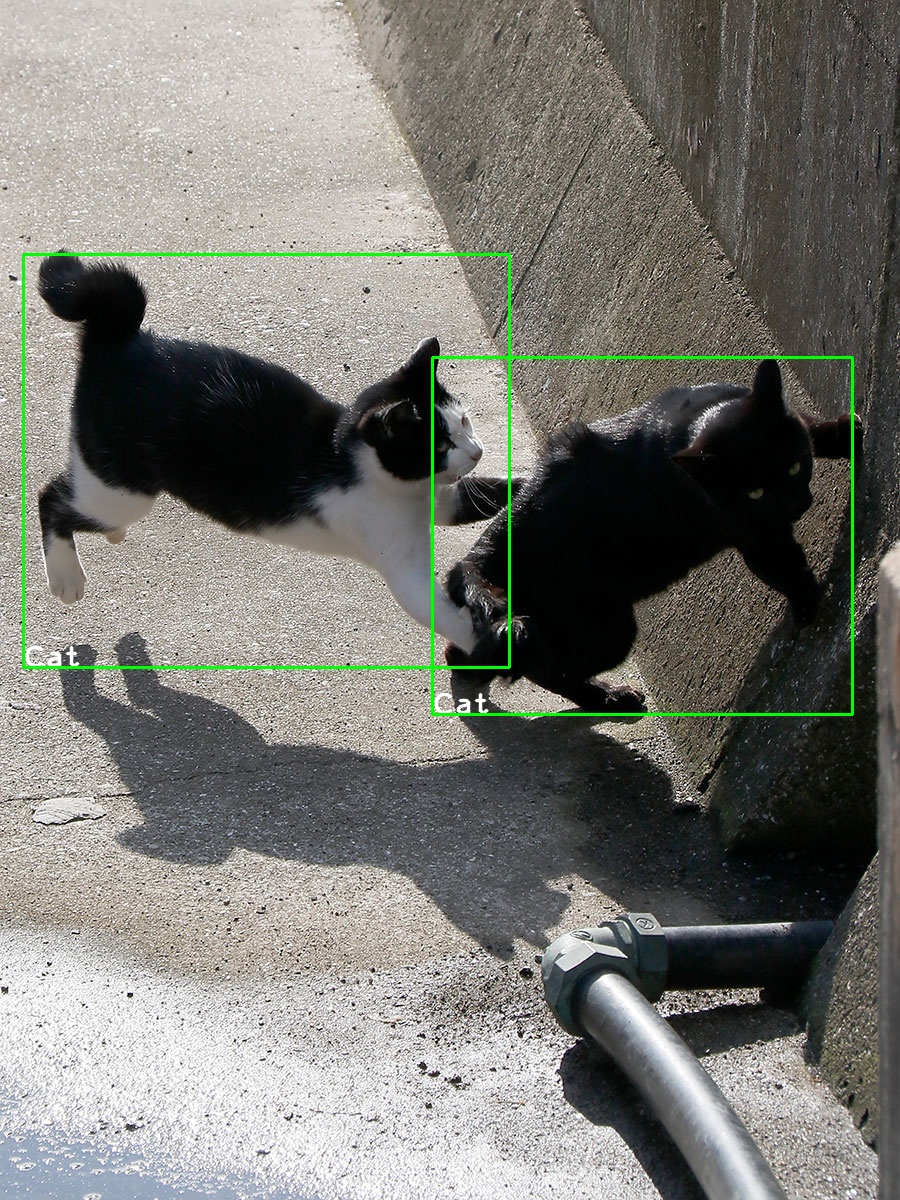
if labelName != 'Cat'をしている理由は別の画像だとCatとDogが混じっていることがあるのでCatに限定した。
本来はConfidenceの高い方を優先するロジックのほうが良さそう。
また、CV2は小数点が使えない感じだったので、math.ceilで切り上げをしている。
追記:Confidenceが90以上のlabelを採用し、Instancesが無いものは設定対象外とした。
まとめ
せっかくBounding Boxがあるので表示してみた。
CV2の使い方もわかって面白い。
python Amazon Rekognition detect_labelsその1
はじめに
Amazon Rekognitionを使用してみる。
Amazon Rekognitionは簡単に言えば画像分析サービス。
画像に有名人がいるかとか、その画像に含まれている要素は何なのかを判断してくれる
ほかにも、文字認識もできる。
今回は画像のラベル検出(detect_labels)を試してみる
準備
下記のプログラムを用意する。
- rekognition.py
import boto3
import sys
import json

if len(sys.argv) != 2:
    exit()

client=boto3.client('rekognition')
#写真を読み出して、Byte変換してdetect_labels送信
file = open(sys.argv[1],'rb')
response = client.detect_labels(Image={'Bytes':file.read()}, MaxLabels=30)
print(type(response))
print(json.dumps(response))

print('Detected labels for ' + sys.argv[1])
print()
for label in response['Labels']:
    print ("ラベル: " + label['Name'])
    print ("信頼: " + str(label['Confidence']))
    print ("**********インスタンス**********")
    for instance in label['Instances']:
        print ("  境界")
        print ("    Top   : " + str(instance['BoundingBox']['Top']))
        print ("    Left  : " + str(instance['BoundingBox']['Left']))
        print ("    Width : " +  str(instance['BoundingBox']['Width']))
        print ("    Height: " +  str(instance['BoundingBox']['Height']))
        print (" 信頼: " + str(instance['Confidence']))
        print()

    print ("Parents:")
    for parent in label['Parents']:
        print ("   " + parent['Name'])
    print ("********************************")
    print ()

label_count=len(response['Labels'])
print("Labels detected: " + str(label_count))
実行結果
画像は以前使用したイーヌ
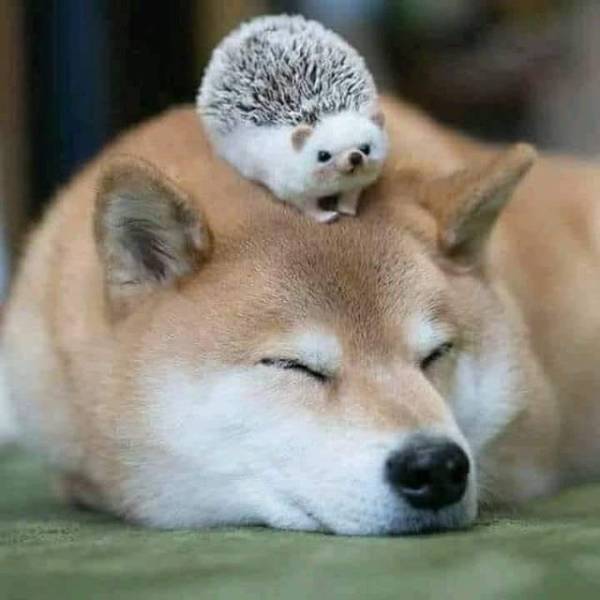
$ python rekognition.py  85898497.jpg

***レスポンス表示は中略***

Detected labels for 85898497.jpg

ラベル: Mammal
信頼: 95.82337188720703
**********インスタンス**********
Parents:
   Animal
********************************

ラベル: Animal
信頼: 95.82337188720703
**********インスタンス**********
Parents:
********************************

ラベル: Wildlife
信頼: 62.20775604248047
**********インスタンス**********
Parents:
   Animal
********************************

ラベル: Hedgehog
信頼: 58.174739837646484
**********インスタンス**********
Parents:
   Mammal
   Animal
********************************

ラベル: Canine
信頼: 56.14072799682617
**********インスタンス**********
Parents:
   Mammal
   Animal
********************************

Labels detected: 5
どこからどう見ても犬だし、ハリネヅミだけど100じゃないのが面白い。
まとめ
今回は手軽に引数の画像を解析するようにしてみたが、S3バケットの画像データからも分析できるので、その方法も試してみたい。
python AWS awscli
はじめに
awscliを使いつつAWSを学ぶ環境を構築する。
準備
下記の手順でawscliの設定とインストールを行う。
$ pip install awscli
$ aws configure
AWS Access Key ID [None]:   IAMの認証情報から取得
AWS Secret Access Key [None]:  最初に配られるCSVから取得
Default region name [None]: ap-northeast-1
Default output format [None]: json
EC2インスタンスを一つ仮に作っておいて以下を投入。
$ aws ec2 describe-instances --filters "Name=instance-type,Values=t2.micro" --query "Reservations[].Instances[].InstanceId"
[
    "インスタンスID"
]
インスタンス情報が取得できればawscliでアクセスできていることがわかる。
まとめ
世がわりとGoogleを使用しているので、Amazonに絞って学習していきたい。
python 画像のアップロードとグレー変換
はじめに
POSTメソッドで画像ファイルをグレーに変換するプログラムを書いてみた。
準備
クライアントで画像をbese64に変換してJSONで転送する。
サーバは画像データを取り出して、一時保存してからグレーに変換してbese64でそのまま返すようにした。
- imageClient.py
import requests, base64

fileName = '85898497.jpg'
headers = {"content-type": "application/json"}
f = open(fileName, 'rb')
b64 = base64.b64encode(f.read())
payload = {'image': b64.decode()}
r = requests.post('http://Server IP Address/image/', json = payload, headers = headers)

imageByte = base64.b64decode(r.text)
w = open('clinetImage.jpg', 'wb')
w.write(imageByte)
- imageServer.py
from flask import Flask, request, json
import base64
import cv2
app = Flask(__name__)

@app.route('/image/', methods=['POST'])
def trans():
    data = request.data.decode('utf-8')
    data = json.loads(data)

    imageByte = base64.b64decode(data['image'])
    w = open('imageFile.jpg', 'wb')
    w.write(imageByte)

    imgBgr = cv2.imread('imageFile.jpg')
    imgGray = cv2.cvtColor(imgBgr, cv2.COLOR_BGR2GRAY)
    cv2.imwrite('imageFileGray.jpg', imgGray)

    r = open('imageFileGray.jpg', 'rb')

    return base64.b64encode(r.read())

if __name__ == '__main__':
    app.run(debug=True, host='0.0.0.0', port=80)
実行
プログラムの実行結果
■変換前画像
■変換後画像

cv2.imreadが変換したバイト配列をそのまま読んでくれればスタイリッシュになりそう。
「cv2.COLOR_BGR2GRAY」を変更すればもっといろいろ変換できそう。
まとめ
画像は拾いもので他意は無いです。
