python pillow Image
はじめに
今回はdetect_facesのBounding Boxとテキストをpillowに置き換えてみる。
※写真はAIで生成したものらしいです。
準備
先にpillowをインストールする。
pip install pillow
下記のプログラムを用意する。
- detect_faces_pillow.py
from PIL import Image, ImageDraw, ImageFont
import boto3, sys, json, os, traceback

#detect_facesで顔の分析結果を返す
def detect_faces(image):
    client=boto3.client('rekognition')
    #写真を読み出して、Byte変換してdetect_faces送信
    file = open(image,'rb')
    response = client.detect_faces(Image={'Bytes':file.read()},Attributes=['ALL'])

    return response

#BoundingBoxを設定する
def set_bounding_box(image, bounding_box_data):
    #画像の高さと幅を取得
    imgWidth, imgHeight = image.size
    draw = ImageDraw.Draw(image)

    #位置を算出
    left = bounding_box_data['Left'] * imgWidth
    top = bounding_box_data['Top'] * imgHeight
    width = bounding_box_data['Width'] * imgWidth
    height = bounding_box_data['Height'] * imgHeight

    points = (
            (left,top),
            (left + width, top),
            (left + width, top + height),
            (left , top + height),
            (left, top)

        )

    draw.line(points, fill='#00d400', width=2)

    return

#指定箇所にtextを設定する
def set_text_image(image, text, pos):

    draw = ImageDraw.Draw(image)
    #フォントの設定
    font_ttf = "/usr/share/fonts/truetype/fonts-japanese-gothic.ttf"
    draw.font = ImageFont.truetype(font_ttf, 25)

    color = (0,255,0)
    #文字の吐き出し
    draw.text(pos, text, color)

    return


if __name__ == '__main__':
    if len(sys.argv) != 3:
        exit()

    in_file_name = sys.argv[1]
    out_file_name = sys.argv[2]

    try:
        #顔分析
        #jsonが無ければ分析あれば使う
        json_file_name = in_file_name + '.json'
        if (os.path.exists(json_file_name) == True):
            file = open(json_file_name, 'r')
            response = file.read()
            response = json.loads(response)
        else:
            response = detect_faces(in_file_name)
            file = open(json_file_name, 'w')
            file.write(json.dumps(response))

        #分析元の画像を読み込み
        image = Image.open(in_file_name)

        #画像に分析結果の設定(複数人できるが今回は一人だけ)
        for faceDetail in response['FaceDetails']:
            #boundingboxを設定
            text = '対象の年齢は'+ str(faceDetail['AgeRange']['Low']) + 'から' + str(faceDetail['AgeRange']['High']) + '歳です。'
            set_bounding_box(image, faceDetail['BoundingBox'])
            set_text_image(image, text, (0,0))
            break


        #結果の出力
        image.save(out_file_name)


    except Exception as e:
        print(e)
        print(traceback.format_exc())
実行方法
python detect_faces_pillow.py 分析したいファイル.jpg 出力したいファイル名.jpg
- 実行結果

BoundingBoxもちゃんと表示され、テキストも日本語で表示されている。
まとめ
Pillowのほうがフォントがボヤボヤしている気がするけど、線はきれい感じがする。
使いでとしては、簡易なCV2と行った感じなのかな?
python Amazon Rekognition Recognize Celebrities
はじめに
今回は有名人の顔を分析するRecognize Celebritiesを使ってみる。
準備
下記のプログラムを用意する。
- recognize_celebrities.py
import boto3, sys, json, cv2, math, os, traceback

#recognize_celebritiesで顔の分析結果を返す
def recognize_celebrities(in_image_file):
    client=boto3.client('rekognition')
    #写真を読み出して、Byte変換してdetect_faces送信
    file = open(in_image_file,'rb')
    response = client.recognize_celebrities(Image={'Bytes':file.read()})

    return response

#Bounding Boxを設定して返す
def set_bounding_box(image_file, bounding_box_data):
    #画像の高さと幅を取得
    imgHeight, imgWidth = image_file.shape[:2]

    #位置を算出
    left = math.ceil(bounding_box_data['Left'] * imgWidth)
    top = math.ceil(bounding_box_data['Top'] * imgHeight)
    width = math.ceil(bounding_box_data['Width'] * imgWidth)
    height = math.ceil(bounding_box_data['Height'] * imgHeight)

    image_file = cv2.rectangle(image_file
                            , (left, top)
                            , (width+left, height+top)
                            , (0,255,0)
                            , 2)

    return image_file

#Bounding Boxの左下に名前を設定して返す
def set_celebrity_name(image_file, celebrity_name, boundingBox):
    #画像の高さと幅を取得
    imgHeight, imgWidth = image_file.shape[:2]

    left = math.ceil(boundingBox['Left'] * imgWidth)
    top = math.ceil(boundingBox['Top'] * imgHeight)
    height = math.ceil(boundingBox['Height'] * imgHeight)

    image_file = cv2.putText(image_file
                            , celebrity_name
                            , (left, height+top)
                            , cv2.FONT_HERSHEY_PLAIN
                            , 2
                            , (255, 255, 255)
                            , 2
                            , cv2.LINE_AA)

    return image_file


if __name__ == '__main__':
    if len(sys.argv) != 3:
        exit()

    in_file_name = sys.argv[1]
    out_file_name = sys.argv[2]

    try:
        #顔分析
        #jsonが無ければ分析あれば使う
        json_file_name = in_file_name + '.json'
        if (os.path.exists(json_file_name) == True):
            file = open(json_file_name, 'r')
            response = file.read()
            response = json.loads(response)
        else:
            response = recognize_celebrities(in_file_name)
            file = open(json_file_name, 'w')
            file.write(json.dumps(response))

        #分析元の画像を読み込み
        origin_image = cv2.imread(in_file_name)
        after_image = origin_image.copy()

        #画像に分析結果の設定
        for celebrity in response['CelebrityFaces']:
            after_image = set_bounding_box(after_image, celebrity['Face']['BoundingBox'])
            after_image = set_celebrity_name(after_image, celebrity['Name'], celebrity['Face']['BoundingBox'])

        #結果の出力
        if after_image is not None:
            cv2.imwrite(out_file_name, after_image)


    except Exception as e:
        print(e)
        print(traceback.format_exc())
実行方法
python recognize_celebrities.py 分析したいファイル.jpg 出力したいファイル名.jpg
- 実行結果

BoundingBoxを設定して、名前を設定してみた。
動作はほぼ共通化していて、流用が簡単にできるのでAmazonのAPIが共通的に作られているかがわかった。
やっぱ、似たようなAPIは似たような構造になるんだよな、普通。
まとめ
今までの集大成で一気に書き上げることができた。
text設定とかはもうちょっとうまくメソッド化できそうだなぁ。
python cv2
cv2のputTextは残念ながら日本語が使えないようだ。 PILのImageDraw.textは使えるみたい。
PILの使い方も覚えて置き換えるのも良さそうだな
Amazon Rekognition Confidence値(信頼度)について
開発者ガイドより、 https://docs.aws.amazon.com/ja_jp/rekognition/latest/dg/rekognition-dg.pdf
引用 正確なラベルを必要とする場合は、信頼度の高い (95% 以上) ラベルに絞り込んで選択します。 信頼値がそれほど高くなくてもよい場合は、信頼値が低い (50% 程度) ラベルに絞り込んで選択してくださ い。
こういうのはメモしておかないと忘れちゃう。
python Amazon Rekognition detect_facesその2
はじめに
detect_facesの結果を分析してBoundingBoxと顔のパーツの位置を埋め込む処理を実装した。
流石にカート・コバーンの画像を使うのは気が引けるので画像なしで。
準備
下記のプログラムを用意する。
- detect_faces.py
import boto3, sys, json, cv2, math, os, traceback

#detect_facesで顔の分析結果を返す
def detect_faces(in_image_file):
    client=boto3.client('rekognition')
    #写真を読み出して、Byte変換してdetect_faces送信
    file = open(in_image_file,'rb')
    response = client.detect_faces(Image={'Bytes':file.read()},Attributes=['ALL'])

    return response

#BoundingBoxを設定して返す
def set_bounding_box(image_file, bounding_box_data):
    #画像の高さと幅を取得
    imgHeight, imgWidth = image_file.shape[:2]

    #位置を算出
    left = math.ceil(bounding_box_data['Left'] * imgWidth)
    top = math.ceil(bounding_box_data['Top'] * imgHeight)
    width = math.ceil(bounding_box_data['Width'] * imgWidth)
    height = math.ceil(bounding_box_data['Height'] * imgHeight)

    image_file = cv2.rectangle(image_file
                            , (left, top)
                            , (width+left, height+top)
                            , (0,255,0)
                            , 2)

    return image_file

#Landmarksを設定して返す
def set_landmarks(image_file, landmarks):
    #画像の高さと幅を取得
    imgHeight, imgWidth = image_file.shape[:2]

    eyeLeft = get_lndmark('eyeLeft', landmarks)
    eyeRight = get_lndmark('eyeRight', landmarks)
    mouthLeft = get_lndmark('mouthLeft', landmarks)
    mouthRight = get_lndmark('mouthRight', landmarks)
    nose = get_lndmark('nose', landmarks)

    landmark_taple_list = [eyeLeft, eyeRight, mouthLeft, mouthRight, nose]

    #位置を算出
    for landmark_taple in landmark_taple_list:
        X = math.ceil(landmark_taple[0] * imgWidth)
        Y = math.ceil(landmark_taple[1] * imgHeight)

        image_file = cv2.rectangle(image_file
                                , (X, Y)
                                , (X, Y)
                                , (0,255,0)
                                , 10)

    return image_file

#landmarkを指定してX,Y取得
def get_lndmark(landmark_type, landmarks):
    for landmark in landmarks:
        if(landmark['Type'] == landmark_type):
            return (landmark['X'], landmark['Y'])

if __name__ == '__main__':
    if len(sys.argv) != 3:
        exit()

    in_file_name = sys.argv[1]
    out_file_name = sys.argv[2]

    try:
        #顔分析
        #jsonが無ければ分析あれば使う
        json_file_name = in_file_name + '.json'
        if (os.path.exists(json_file_name) == True):
            file = open(json_file_name, 'r')
            response = file.read()
            response = json.loads(response)
        else:
            response = detect_faces(in_file_name)
            file = open(json_file_name, 'w')
            file.write(json.dumps(response))

        #分析元の画像を読み込み
        origin_image = cv2.imread(in_file_name)
        after_image = origin_image.copy()

        #画像に分析結果の設定
        for faceDetail in response['FaceDetails']:
            #boundingboxを設定
            print('対象の年齢は'+ str(faceDetail['AgeRange']['Low']) + 'から' + str(faceDetail['AgeRange']['High']))
            after_image = set_bounding_box(after_image, faceDetail['BoundingBox'])
            after_image = set_landmarks(after_image, faceDetail['Landmarks'])


        #結果の出力
        if after_image is not None:
            cv2.imwrite(out_file_name, after_image)


    except Exception as e:
        print(e)
        print(traceback.format_exc())
実行方法
python detect_faces.py 分析したいファイル.jpg 出力したいファイル名.jpg
今回のは関数分けをして見通しを良くしたのと何度も分析しないようにレスポンスを外に吐き出すようにした。
例外も盛り込んでNG処理をスッキリさせることもできた。
landmarkはX,Yの2値なのでタプルを作って、タプルの配列に設定してforで回してみた。
まとめ
大体やってみたいことは実装できた。
タプルの取得と配列設定はもう少しスッキリかっこよく書く方法はないものかな?
python Amazon Rekognition detect_facesその1
はじめに
Amazon Rekognitionでdetect_facesを使用してみる。
今回は書くことがないので短め
準備
下記の画像をdetect_facesで分析させる。

下記のプログラムを用意する。
- detect_faces.py
import boto3, sys, json

if len(sys.argv) != 2:
    exit()

client=boto3.client('rekognition')
#写真を読み出して、Byte変換してdetect_faces送信
file = open(sys.argv[1],'rb')
response = client.detect_faces(Image={'Bytes':file.read()},Attributes=['ALL'])

print('Detected faces for ' + sys.argv[1])
print()
for faceDetail in response['FaceDetails']:
    print(json.dumps(faceDetail, indent=4, sort_keys=True))
実行方法
python detect_faces.py 画像ファイル.jpg
実行結果
Detected faces for kurt-cobain-20191028-001.jpg

{
    "AgeRange": {
        "High": 34,
        "Low": 22
    },
    "Beard": {
        "Confidence": 77.95692443847656,
        "Value": true
    },
    "BoundingBox": {
        "Height": 0.23728753626346588,
        "Left": 0.36626124382019043,
        "Top": 0.07902675867080688,
        "Width": 0.10884405672550201
    },
    "Confidence": 99.9982681274414,
    "Emotions": [
        {
            "Confidence": 66.24143981933594,
            "Type": "CALM"
        },
        {
            "Confidence": 19.93850326538086,
            "Type": "CONFUSED"
        },
        {
            "Confidence": 4.765133380889893,
            "Type": "SAD"
        },
        {
            "Confidence": 3.4628701210021973,
            "Type": "SURPRISED"
        },
        {
            "Confidence": 3.388702869415283,
            "Type": "ANGRY"
        },
        {
            "Confidence": 0.9147283434867859,
            "Type": "FEAR"
        },
        {
            "Confidence": 0.8962799906730652,
            "Type": "DISGUSTED"
        },
        {
            "Confidence": 0.3923453986644745,
            "Type": "HAPPY"
        }
    ],
    "Eyeglasses": {
        "Confidence": 99.44938659667969,
        "Value": false
    },
    "EyesOpen": {
        "Confidence": 97.86561584472656,
        "Value": true
    },
    "Gender": {
        "Confidence": 99.65865325927734,
        "Value": "Male"
    },
    "Landmarks": [
        {
            "Type": "eyeLeft",
            "X": 0.39052438735961914,
            "Y": 0.16976229846477509
        },
********中略********
    ],
    "MouthOpen": {
        "Confidence": 69.85497283935547,
        "Value": false
    },
    "Mustache": {
        "Confidence": 91.35269165039062,
        "Value": false
    },
    "Pose": {
        "Pitch": 19.76197624206543,
        "Roll": 0.11792755126953125,
        "Yaw": -20.5476016998291
    },
    "Quality": {
        "Brightness": 93.4253921508789,
        "Sharpness": 86.86019134521484
    },
    "Smile": {
        "Confidence": 99.43907165527344,
        "Value": false
    },
    "Sunglasses": {
        "Confidence": 99.6850814819336,
        "Value": false
    }
}
まとめ
細かな解説は後日に。
これもBoundingBoxを付与したりしてみたい。
python Amazon Rekognition detect_labelsその2
※若干プログラムを修正しました。
はじめに
Amazon Rekognitionで分析した画像にBoundingBoxとラベルを表示させてみる。
準備
事前に下記の画像をAmazon Rekognitionで分析させてJsonファイルを取得しておく。

下記のプログラムを用意する。
- detect_labels.py
import boto3, sys, json, cv2, math, os, traceback

#detect_labelsで画像の分析結果を返す
def detect_labels(in_image_file):
    client=boto3.client('rekognition')
    #写真を読み出して、Byte変換して送信
    file = open(in_image_file,'rb')
    response = client.detect_labels(Image={'Bytes':file.read()}, MaxLabels=30)

    return response

#BoundingBoxを設定して返す
def set_bounding_box(image_file, label_name, instances):
    #画像の高さと幅を取得
    imgHeight, imgWidth = image_file.shape[:2]

    for instance in instances:
        left = math.ceil(instance['BoundingBox']['Left'] * imgWidth)
        top = math.ceil(instance['BoundingBox']['Top'] * imgHeight)
        width = math.ceil(instance['BoundingBox']['Width'] * imgWidth)
        height = math.ceil(instance['BoundingBox']['Height'] * imgHeight)

        image_file = cv2.putText(image_file
                                , label_name
                                , (left, height+top)
                                , cv2.FONT_HERSHEY_PLAIN
                                , 2
                                , (255, 255, 255)
                                , 2
                                , cv2.LINE_AA)
        image_file = cv2.rectangle(image_file
                                , (left, top)
                                , (width+left, height+top)
                                , (0,255,0)
                                , 2)
    return image_file

if __name__ == '__main__':
    if len(sys.argv) != 3:
        exit()

    in_file_name = sys.argv[1]
    out_file_name = sys.argv[2]

    try:
        #jsonが無ければ分析あれば使う
        json_file_name = in_file_name + '.json'
        if (os.path.exists(json_file_name) == True):
            file = open(json_file_name, 'r')
            response = file.read()
            response = json.loads(response)
        else:
            response = detect_labels(in_file_name)
            file = open(json_file_name, 'w')
            file.write(json.dumps(response))

        #分析元の画像を読み込み
        origin_image = cv2.imread(in_file_name)
        after_image = origin_image.copy()

        #画像にBounding Boxの設定
        for label in response['Labels']:
            #信頼が90未満の場合設定しない
            if label['Confidence'] < 90:
                continue
            #Instancesが無い場合は設定しない
            if not label['Instances']:
                continue

            after_image = set_bounding_box(after_image, label['Name'], label['Instances'])

        #結果の出力
        if after_image is not None:
            cv2.imwrite(out_file_name, after_image)
    except Exception as e:
        print(e)
        print(traceback.format_exc())
実行方法
python boundingBox.py bef.jpg aft.jpg
実行結果
Bounding Boxを付与したイメージが以下となる。
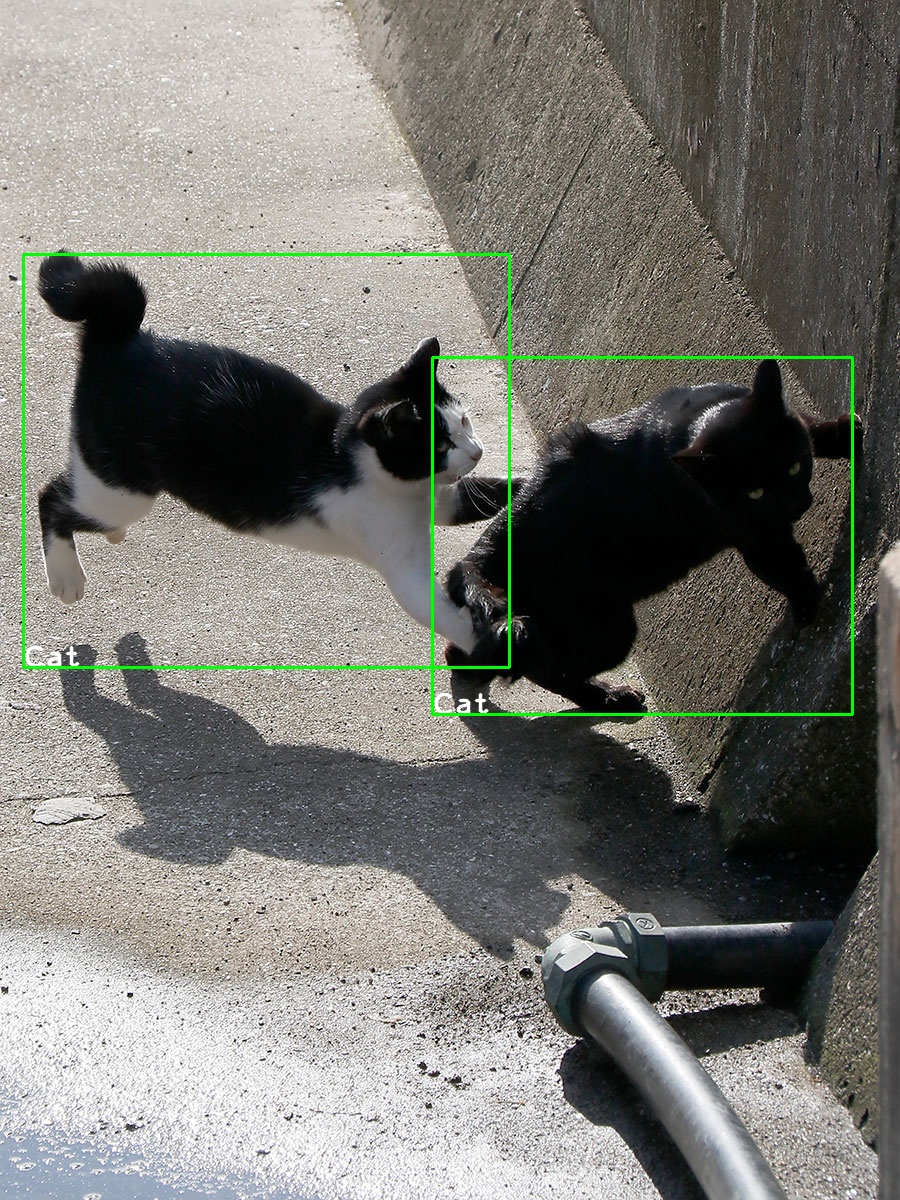
if labelName != 'Cat'をしている理由は別の画像だとCatとDogが混じっていることがあるのでCatに限定した。
本来はConfidenceの高い方を優先するロジックのほうが良さそう。
また、CV2は小数点が使えない感じだったので、math.ceilで切り上げをしている。
追記:Confidenceが90以上のlabelを採用し、Instancesが無いものは設定対象外とした。
まとめ
せっかくBounding Boxがあるので表示してみた。
CV2の使い方もわかって面白い。